For the first 5km or so from the airport we took the freeway (there should be another road too, but that wasn't signposted) until the next exit, where cyclists must exit. The freeway heads approximately SW, the main road afterwards is almost exactly S, and almost totally straight. It's mostly flat too, just a few small hills in Geelong and further S. Consequently, one is essentially unshielded from any wind on this stretch.
The freeway and most of the other road has a good cycleable shoulder of adequate to excellent width. Inside Geelong there often is no shoulder but instead a good service road.
Torquay is the official starting point of the Great Ocean Road, which is a bit ironic, as the road immediately turns inland and meets the ocean again at Anglesea. This stretch goes over a few hills (reaching about 100m a.s.) but they are not very steep. Most of the road has a decent shoulder.
This stretch follows the coast line. Most of it is not at sea level but a few dozen metres elevated on the top of the cliffs. Consequently there is a bit up-and-down, but nowhere near as much as we had expected (much less than the coastal road heading south from Sydney, which is essentially a sequence of 0.5–1km stretches along the beach followed by a similar distance on top of the cliffs, with often steep climbs in between).
About 2/3 of the road has a shoulder, the remaining bits can be quite dangerous, as we experienced.
This stretch of road is considered the most spectacular part of the Great Ocean Road, but we found it quite over-hyped. It sure has some beautiful scenery, but not more so than the NSW South Coast, particularly between Sydney and Shoalhaven.
On this stretch the road runs inland again, first though Otway National Park (staying a fair bit north of Cape Otway, the southernmost point west of Melbourne). It touches the coast at Glenaire (just enough to see the ocean) before turning inland again to Lavers Hill and back down to the Gellibrand River.
This part goes through forest and is, to us, the most beautiful part of the ride. The part through the Otway has a good grade, raises up to about 250m, undulates there for a bit and then drops down to almost sea level. This is followed by about 10km of a very flat valley, which funnels the southerlies and easterlies into your face with virtually no protection.
At Glenaire at the coast there is a sharp bend followed by the climb op to Lavers Hill. This one is steeper than the Otway, but still not too bad in most places, but you spend a fair bit in first gear. There are virtually no counter-climbs until the top at about 500m elevation.
The way down is less regular, and probably better done downhill than uphill, except with southerly or easterly winds (which are common here).
Probably less than half of this section of road has a usable shoulder (but traffic was very light when we rode it).
From the dip at the Gellibrand we took the Old Ocean Road, which is unsealed but in excellent condition (virtually no corrugations), very flat and no traffic at all. We would highly recommend taking it. The turnoff [54H665.5/5711.2] is easy to find, just at the foot of the (pretty steep) hill immediately after crossing the Gellibrand. There is an old road sign too. Going the other way, the turnoff to the right should also be easy to find, it is about 100–200m after a sharp left turn, and the unsealed road is clearly visible to the right.
The road follows the coast again. There is a bit up-and-down, but it isn't hard (the steepest bit is leaving Port Campbell). Mostly there is a good shoulder.
This is the most famous part of the Great Ocean Road, with plenty of pinnacles maybe 20–30m high and with mostly vertical sides. They have fanciful names, like the Twelve Apostles (of which only 11 are left) and the London Bridge (which is now an island after the collapse of the northern arch about 15 years ago). The waves break very dangerously around the cliffs.
After Peterborough the road follows the coast for about another 5km, past Massacre Hill, a memorial to Aborigines who were once massacred here. Regrettably, it has shared the fate of almost all memorials to murdered Aborigines in Australia—vandalised by racists, mostly with gun shots.
The road then turns inland and runs mostly totally straight except for some sharp turns, and it is mostly totally flat and with a good shoulder. Past Nirranda [54H651.5/5737.3] we keep going straight rather than following the main road which does a 90° right turn. This takes us on some very quiet, small roads in excellent condition, slightly undulating and avoids about 14km worth of main road. We could have avoided another 2km of main road by taking a 1.5km stretch of unsealed road at [54H646.5/5741.0], which we would have done if the main road had been busyer; the dirt road certainly seemed in very good shape. So we do another 3km on the main road before turning off onto another dirt road [54H642.7/5747.2]. This runs for about 4km. Not all of it is very nice, in places it is quite corrugated. It is flat with some downhill bits. It finally turns into a sealed road again, which takes us the last 9km into Warrnambool. This way we avoid about 17km of main highway, about 11km of which is actually the Princes Highway (A1). Warrnambool is the official end of the Great Ocean Road.
From Warrnambool we have no choice but ride on the Princes Highway, one of the roads carrying most of the heavy traffic (including road trains) between Victoria and South Australia. The road has continuous wide shoulders, but most of it has a horribly rough surface. We ride on the divider line whenever traffic is light. The road is mostly flat, with the odd undulations to break the monotony.
The last 8km into Port Fairy we take a small side road closer to the ocean, separated from the A1 by a long lake. The road is easy riding, but has a surprising amount of traffic, which is certainly not all due to the small air strip and the golf course. Obviously a lot of locals are using it, probably mostly those heading to the southern end of Port Fairy.
The stretch between Port Fairy and Portland is pretty much the same as the previous parts of the A1. The main features are Codrington Wind Farm and a bit of a hill just north of Portland.
The A1 heads north from Portland, and the road to Nelson has little traffic. The only heavy traffic are the road trains carrying wood chips, a few of these pass us per hour. The road is mostly brand new, taxpayers' subsidy for the wood-chipping industry. The first half is though lovely grazing countries and along some forests, slightly hilly.
The second part is mostly along pine plantations (for wood chipping)—they look quite out of place. (Apparently there is a fair bit of a problem in the nearby Glenelg National Park with encroachment by those introduced species.) The road is slightly undulating, and overall keeps going up a bit (reaching around 100m altitude) until some nice downhill runs just before Nelson.
The Punt Road from Nelson to Mount Gambier is nice and slightly undulating (don't remember whether it has a shoulder). About 4km past Nelson is the SA border, with the usual quarantine bins for fruit. 22km past Nelson (about 22km short of Mount Gambier) we turn west at Caveton [54H483.0/5800.6]. There is actually no visible settlement, but the turnoff is easy to find: it is marked ``Heavy Vehicle Bypass''. Our map shows the first 5.5km (due west) as unsealed, but in fact it is very nice bitumen (and probably has been sealed for quite a few years). It runs straight towards Mount Schank, an extinct volcano of almost perfectly conical shape. The map shows roads going either way around it, but we can only see the one that bypasses it on the south.
The road is almost without traffic (which ``heavy vehicles''?) until it hits the A1 again 3km past Tantanoola. It's very flat and in excellent condition throughout (no shoulder, but there is no need given the lack of traffic). With 55km it's about the same length as the main road through Mount Gambier, but certainly much more peaceful riding. There are several settlements with stores and petrol stations, so water supply is no issue. We generally had no problems knowing where to head, except in Kongorong, where we had to check the compass to navigate past several intersections with unclear signposting.
The remaining 11km to Millicent are on the A1 again, which is busy but wide and has a good shoulder.
From Millicent the Princes Highway stays inland, and we instead follow the Southern Ports Highway (Alt A1) via Beachport and Robe to Kingston SE. There is light to moderate traffic, virtually no heavy vehicles. The road is in parts very flat, in parts slightly undulating when it crosses sand dunes. (We don't remember whether it had a shoulder, probably not, but in any case it is not necessary.) Fairly uneventful riding.
At Kingston we are back on the Princes Highway, which stays close to the shore until Meningie. The road is in excellent condition. The first half (to Policemans Point) is totally flat, and has no shoulder. There are a fair number of red and black posts, which Transport SA puts up for each traffic casualty (red for injuries, black for deaths), serving as warning signs to motorists. We would expect that the road has a lot of traffic under normal circumstances, including plenty of road trains, and might be a bit intimidating for cyclists. Fortunately, during the time we ride here (late afternoon on New Years Eve and early on New Years Day) it is almost deserted.
The second half is slightly hilly (sand dunes) and has shoulders (and no more red or black poles). We don't use them, as they are much rougher than the road, and there is almost no traffic.
This stretch of road is hilly, although never steep. There is a continuous good shoulder, which is highly appreciated (and used) by us, even though it is rougher than the road, as the traffic is significant (but probably still light compared to average conditions).
The South East Freeway starts just SE of Murray Bridge, so from there to Adelaide traffic is very light on the roads we are riding. At the beginning of the freeway there is good signposting helping cyclists staying on the quiet road to Adelaide (via Murray Bridge).
Murray Bridge is where the hills start. The first taste we get already riding out of town, where there is a fair and moderately-steep climb. Unfortunately, there is no more signposting for the benefit of cyclists, signs to “Adelaide” clearly lead to the freeway. A map is essential.
The road is beautiful as it winds through the hills and lovely small towns. It is mostly uphill, in times quite steep, with (fortunately) few downhill bits, so we don't lose much altitude until reaching the top at Crafers, at about 500m altitude. Up to that points it's probably a total climb of about 700–800m.
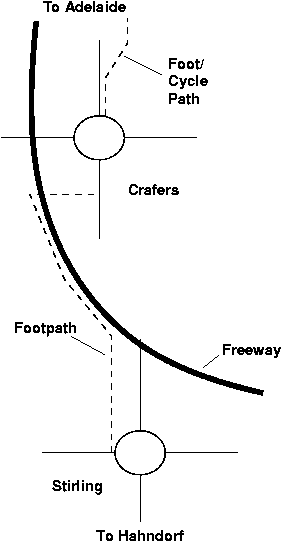
From Stirling it is hard to find the way to Adelaide. The road through town leads to a roundabout with roads to the right and left going to places you don't want to go, and straight ahead is nothing but the freeway on-ramp. The trick (as indicted in the diagram on the right) is to find the footpath that starts just to the left of the roundabout, at the road coming from the left.
It is a steep path that was once sealed but is badly broken up. It follows the freeway (but a fair bit above it) and leads after few 100m to a residential road. Follow this for another few 100m until a large footbridge that goes across the freeway. It leads across to Crafers, onto a road, across from a petrol station, and a few 100m away from another roundabout. At the other side of that roundabout is another path, with separate lanes for cyclists and pedestrians. This leads you to a beautiful cyclists “freeway” right down the hill and into Adelaide.
The opposite direction, coming from Adelaide, should be easy to find: follow Glen Osmond Road to its end, avoiding getting onto the freeway, and you should get onto the steep road easily (there are probably signs too). The footbridge should be easy to find too, the only challenge would be to find the footpath to Stirling, which should not be difficult as long as you stay as close to the freeway as possible.